Remote IP = 3.15.6.77
Steps for Remote Access
|
Before your beamtime starts
|
|
On the day of your remote experiment
|
REMOTE ACCESS TO GM/CA @ APS WITH NX WEBPLAYER Before you proceed: watch Webplayer video guide.
| |||
| Webplayer is accessible to registered GMCA remote users for the time of their experiment only. |
PRECONFIGURED NX™ SESSIONS FOR REMOTE ACCESS TO GM/CA @ APS (right-click to download and use with already installed NxPlayer)
|
|||||||
| NX Templates are accessible to registered GMCA remote users for the time of their experiment only. Please contact your GMCA host if you need the templates outside of allocated beamtime slot. | |||||||
1) Note-1: Our beamline computers operate under CentOS-7, a free clone of Redhat Enterprise Linux-7. We use Mate graphical destop as a faster alternative to Gnome3, the default desktop of this operating system. For the sake of simplicity, other Linux desktops, such as Gnome3, KDE, Unity, Xfce, Cinnamon, and etc., are not supported.
2) Note-2: Shadow sessions establish additional connections to already running remote sessions. They provide collective viewing/controlling of the same desktop. These sessions are mostly meant for the GM/CA @ APS staff when there is a need to help users remotely. Shadow sessions are not recommended for users with slow network connections since streaming multiple remote desktops may result in a degraded performance. Be aware that with NxPlayer, after opening the shadow session and connecting to remote computer, you need to do Ctrl+Alt+DoubleClick (Cmd+Alt+DoubleClick on MacOSX) on the running session icon in order to shadow it. See this FAQ for additional details.
|
SUMMARY OF REMOTE CONNECTION TOOLS | |
|
Download automounter templates Transfer data with Globus Online, bbcp, or FDT |
|
|
Flowchart of remote connection options (click to enlarge)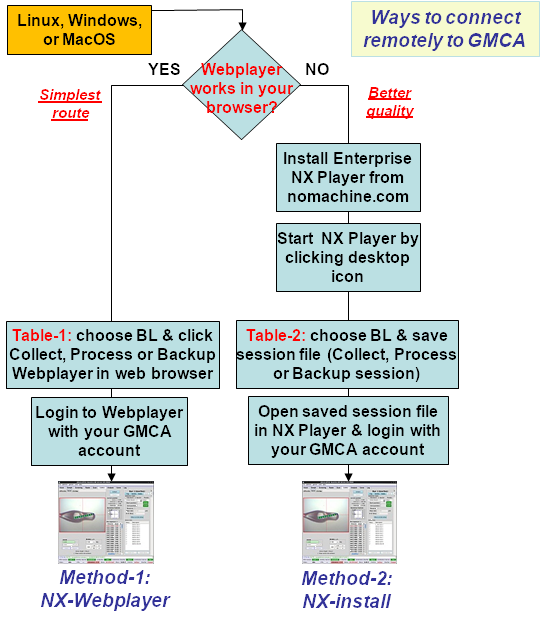
|
 it is very