Data Processing Launcher (dp)
Quick Start
- Back to launcher overview
- See screenshot and diagram ideas
- Open the launcher with
qp2/bin/dp. - Add data with
Add Files...,Add Directories..., orAdd from List.... - Choose a pipeline.
- Review the auto-generated output root.
- Enable
Merge all datasets into ONE jobif appropriate. - Click
Submit Jobs to Cluster.
Overview
dp is the standalone processing launcher dialog. It starts the same core processing dialog that iv and dv can open from inside their own interfaces.
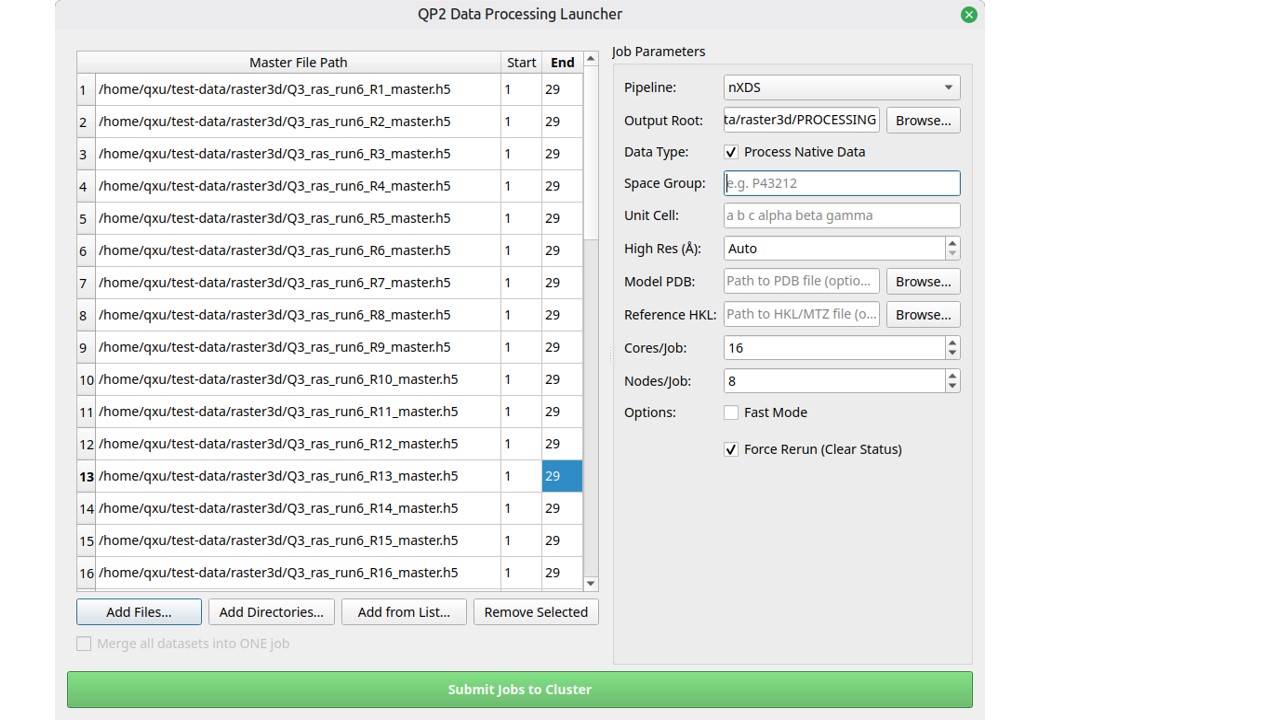
dp main dialog: dataset list on the left, processing parameters on the right.Use dp when:
- you want to submit jobs without opening
ivordv - you already know which master files to process
- you want explicit control over pipeline, merge behavior, output root, and advanced options
The launcher script is qp2/bin/dp, which starts qp2.data_proc.client.dataset_processor_dialog.
Main Layout
The dialog is split into two main panels.
Left panel: dataset management
Main elements:
- dataset table with columns:
Master File PathStartEnd
- action buttons:
Add Files...Add Directories...Add from List...Remove Selected
- merge controls:
Merge all datasets into ONE job- merge method selector for XDS-oriented merge behavior
Use this panel for:
- collecting input datasets
- trimming frame ranges
- removing paths you do not want to submit
- enabling multi-dataset merge mode
Right panel: job parameters
Main elements:
PipelineOutput RootProcess Native DataSpace GroupUnit CellHigh Res (A)Model PDBReference HKLCores/JobNodes/JobFast ModeTrust Beam CentreForce Rerun (Clear Status)
Use this panel for:
- choosing the processing engine
- steering crystallographic constraints
- controlling job size and output placement
- forcing reruns when old state should be cleared
Adding Datasets
Add Files...
Use this when:
- you know the exact HDF5 master files you want
Behavior:
- opens a file picker filtered to
*_master.h5 - each selected path is added to the dataset list
Add Directories...
Use this when:
- you want QP2 to scan one or more directories for valid master files
Behavior:
- supports selecting multiple directories
- offers a scan-options dialog before searching
- scans in the background and adds matching datasets to the list
Typical benefit:
- useful for batch submission from a collection folder
Add from List...
Use this when:
- you already have a text file with one dataset path per line
Behavior:
- ignores empty lines and comment-like lines
- strips surrounding quotes if present
- adds only paths that exist on disk
Remove Selected
Remove highlighted dataset rows from the submission list.
Dataset Table Behavior
Each dataset row stores:
- full master-file path
- start frame
- end frame
What to expect:
- QP2 tries to read the HDF5 file and determine the total frame count
- if that fails, it falls back to a default frame count for the table row
- adding more than one dataset automatically turns on the merge checkbox
Pipeline Selection
The Pipeline combo controls which backend will be used.
Common pipelines exposed in the dialog include:
XDSnXDSautoPROCxia2xia2_ssxCrystFEL
Practical guidance:
- use
XDS,autoPROC, orxia2for standard rotation datasets - use
nXDS,xia2_ssx, orCrystFELfor serial or multi-hit workflows depending on your experiment
Merge Behavior
Merge all datasets into ONE job
Use this when:
- several selected datasets should be treated as one merged job
Typical supported pipelines:
xia2autoPROCxia2_ssxXDSnXDS
Important note:
- merge behavior is pipeline-specific; some pipelines launch one job per dataset before an additional merge step
Merge method selector
Visible when relevant for XDS-oriented workflows.
Typical values:
xscalexia2_multiplex
Output Root Behavior
The Output Root field is auto-populated from the first dataset.
Typical behavior:
- if the source path contains
/data/or/DATA/, QP2 rewrites it toward/processing/or/PROCESSING/ - otherwise QP2 creates a sibling
PROCESSINGdirectory under the dataset location
Practical tip:
- leave the auto-generated value when it matches the beamline layout
- override it manually when you want to isolate a test or custom run
Common Job Parameters
Process Native Data
Use this checkbox to mark the run as native rather than anomalous-style processing.
Space Group and Unit Cell
Use these when you want to constrain processing with known crystallographic values.
High Res (A)
Use this to set a high-resolution cutoff.
Model PDB
Supply a model file when downstream steps or reference-aware workflows need it.
Reference HKL
Supply a reflection or reference file when the chosen workflow supports it.
Cores/Job and Nodes/Job
Use these to control how many cluster resources QP2 requests per job.
Fast Mode
Use this when you want a faster but potentially less exhaustive run where supported.
Trust Beam Centre
Relevant mainly to xia2-oriented workflows.
Force Rerun (Clear Status)
Use this when you want to clear old state before submitting again.
Advanced CrystFEL Settings
The CrystFEL section is collapsible and only relevant when you are running a CrystFEL workflow.
Typical settings include:
- peak algorithm
- minimum peaks per frame
- minimum SNR
- local background radius
- threshold estimation or manual threshold
- peak pixel limits
- optimization toggles such as:
Use peakfinder8-fastUse asdf-fastDisable retry on failureDisable multi-indexingDisable refinementDisable peak checkingReject Non-HitsInclude Bad Pixel Mask
- indexing methods such as:
xgandalfmosflmasdfdiraxtaketwosmallcellxdspinkindexerffbidxfelix
- integration settings and extra options
Use this section when:
- you need tighter control over hit finding and indexing behavior for serial data
Submission Workflow
- Build the dataset list.
- Review or adjust frame ranges.
- Choose the pipeline.
- Review output root and key crystallographic parameters.
- Enable merge mode if needed.
- Open advanced CrystFEL settings if using CrystFEL.
- Click
Submit Jobs to Cluster.
What to expect:
- QP2 validates and prepares the submission payload
- the final submission uses the configured backend job-submission logic
- successful submission shows a confirmation message
- submission failure shows an error message and leaves the dialog open
Typical Workflows
Process one dataset
Add Files...- choose one master file
- choose the pipeline
- adjust parameters if needed
- submit
Process several datasets
- add several files, directories, or a list file
- confirm all rows in the table
- decide whether to merge
- set output root and pipeline
- submit
Run CrystFEL with custom indexing options
- add the serial datasets
- choose
CrystFEL - expand
Show Advanced CrystFEL Settings - review threshold, indexing, and optimization settings
- submit
Caveats
dpassumes a working cluster-oriented processing environment; a local Python install alone may not be enough for real job submission.- The output root is auto-derived from the first dataset, so mixed-source dataset sets may need manual cleanup.
- Multi-dataset behavior varies by pipeline.
- Some advanced controls are meaningful only for specific backends such as CrystFEL or xia2.
Force Rerun (Clear Status)is useful but should be used deliberately when rerunning prior work.